Terraform: Infrastructure as Code (IaC) Tool
Introduction:
Terraform is an open-source Infrastructure as Code (IaC) tool developed by HashiCorp. It allows you to automate the provisioning, management, and scaling of infrastructure using code. This declarative tool helps users describe the desired infrastructure in code, and Terraform ensures that the infrastructure matches the declared state.

Why Terraform?
Terraform is known for its simplicity and declarative nature.
- Easy syntax: Simple, human-readable configurations.
- No specific order: You don’t need to follow a particular sequence of steps when defining infrastructure.
- State management: Terraform tracks and stores the infrastructure state, ensuring consistency across environments.
Terraform uses HCL (HashiCorp Configuration Language), a language that supports variables, data types, conditions, loops, functions, and more. It integrates with various providers like AWS, Azure, GCP, and others, allowing users to automate infrastructure deployment across multiple cloud platforms.
Terraform Providers
- Providers allow Terraform to interact with different infrastructure platforms like AWS, Azure, GCP, GitHub, and Alibaba. Each platform exposes services (resources), such as instances, DNS records, or IAM roles.
- For example, in AWS, EC2 instances, Route 53 records, and IAM roles are all resources managed by Terraform.
- Terraform Providers Registry: https://registry.terraform.io/browse/providers
Challenges with Manual Infrastructure
Before IaC tools like Terraform, infrastructure provisioning was typically done manually through consoles or APIs. This approach presented several challenges:
- Inconsistent infrastructure: Manual changes could cause inconsistencies between environments (e.g., development vs. production).
- Version control: Tracking infrastructure changes manually is difficult.
- Downtime risks: Manual errors could lead to significant downtime, costing businesses time and money.
- No automation: Repeating tasks in different environments was time-consuming.
Installation process of Terraform
Follow these steps to install Terraform on your machine:
- Download Terraform from the official site https://developer.hashicorp.com/terraform/install and extract the zip file.
- Add the extracted folder path to the system’s environment variables.
- Open Git Bash or any terminal and enter the command
terraformto verify the installation.
Creating an AWS EC2 Instance with Terraform
Step-by-Step Process
- Initialize provider file: Create a
provider.tffile, declaring the provider (e.g., AWS).
Here’s an example:

2. Configure authentication: Install the AWS CLI (Command Line Interface) from the https://docs.aws.amazon.com/cli/latest/userguide/getting-started-install.html.
- Run
aws configurein Git Bash to set up your access and secret keys, region, and output format.
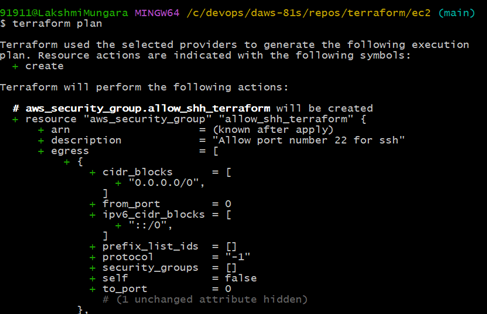
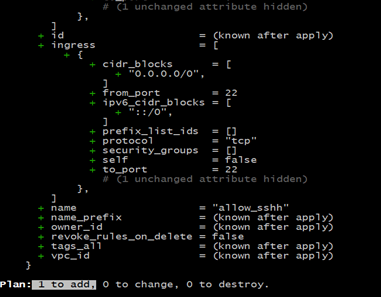
3. Create a security group for the EC2 instance: Use Terraform to create an EC2 instance with an SSH-enabled security group
Ingress: means incoming traffic
Egress: means outgoing traffic
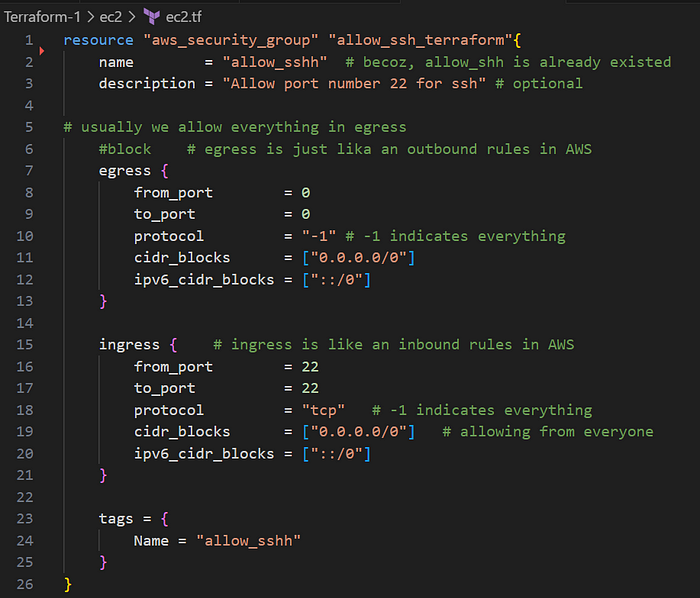
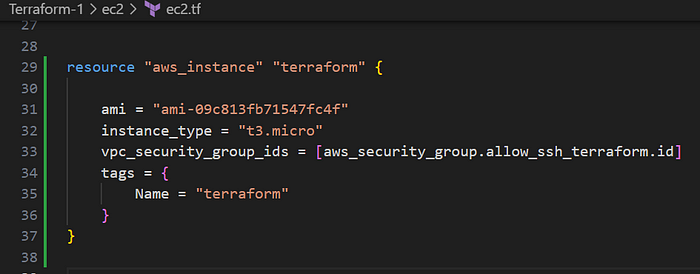
Now, create a resource for the Ec2 instance;
- ami_id
- instance_type
- vpc_security_group_id
- tags — Name
4. Runterraform init: Initialize Terraform, download provider plugins, and prepare the environment for provisioning.
terraform initResult:
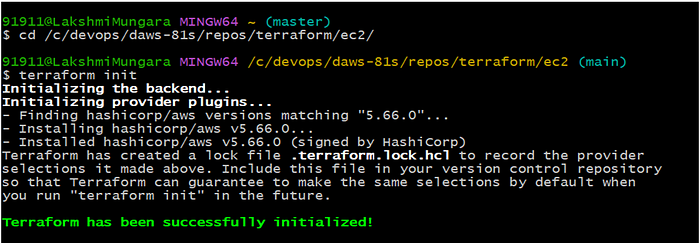
- The Ec2 folder has a .terraform created file after initialization
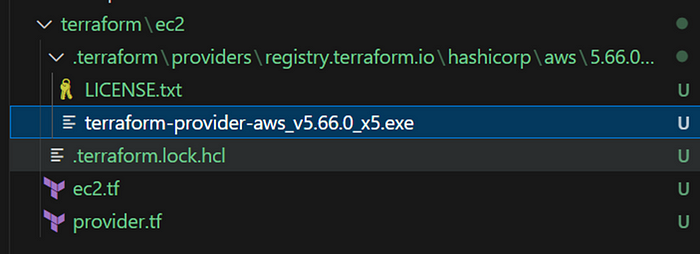
- Add .gitignore content from the link https://github.com/github/gitignore/blob/main/Terraform.gitignore to avoid the merging of .terraform folder
5. Runterraform plan: It helps users ensure that changes are correct before actually applying them to avoid unintended modifications.
terraform planResult:
6. Runterraform apply Or terraform apply -auto-approve:The commandterraform apply -auto-approve is used to apply Terraform changes without manual confirmation. Normally, when you runterraform apply, Terraform shows a plan of what it will do (e.g., creating, modifying, or deleting resources) and asks for your confirmation (you type "yes" to proceed).
terraform apply -auto-approveResult:

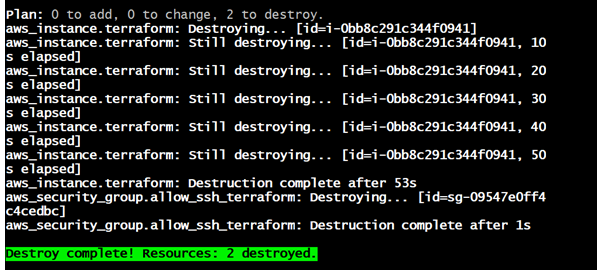
Destroying Resources
To clean up the infrastructure,
terraform destroy -auto-approveThis will delete the instance and its associated security group in AWS.
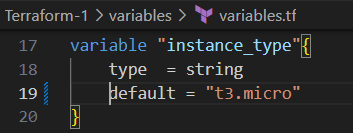
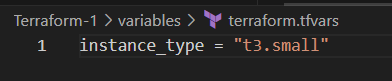
Variables in Terraform
Terraform supports variables for making configurations dynamic. Variables can be declared in avariables.tf file or overridden using terraform.tfvars.
Here’s an example:
Override it via command-line argument:
terraform plan -var="instance_type=t3.large"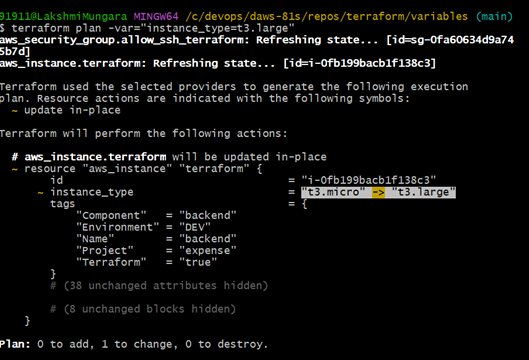
Environment variables:export TF_VAR_instance_type="t3.xlarge"
- Give the terraform plan to see that it is changed from t3.micro to t3.xlarge
Variables order preference:
- command line arguments
- terraform.tfvars
- Environment variables
- default variables
- prompt
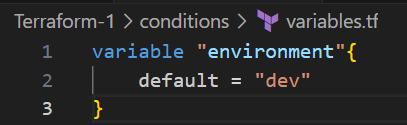
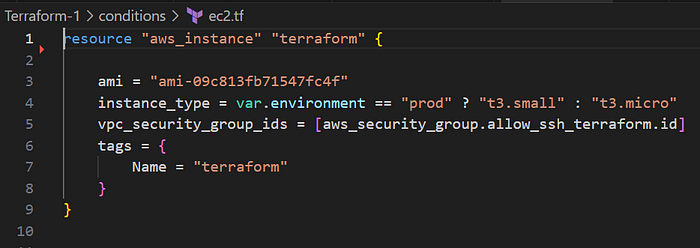
Terraform Conditions
In Terraform, conditions are used to control the flow of resources, outputs, and variables based on certain criteria. The most common way to apply conditional logic in Terraform is by using the ternary operator for inline conditions.
Terraform Loops
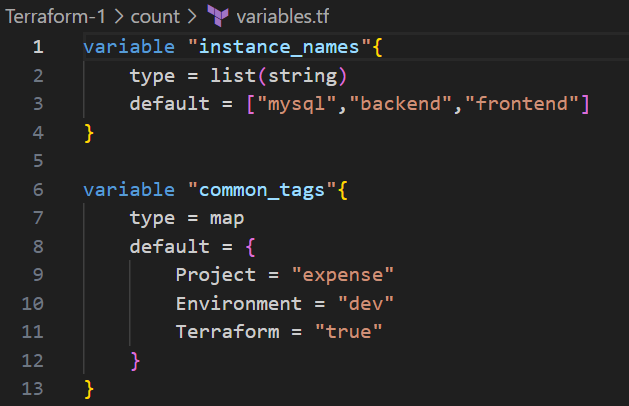
In Terraform, loops allow you to create multiple resources or outputs from a list or map of data, making your code more dynamic and reusable. Terraform provides two main ways to create loops:
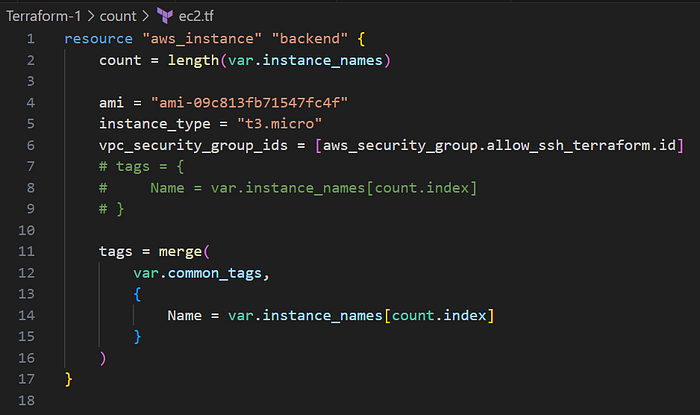
count(for simple loops, typically with lists)
resource "aws_instance" "terraform" {
   count = 3
   ami = "ami-09c813fb71547fc4f"
   instance_type = "t3.micro"
   tags = {
       Name = "backend"
   }
}
To give each instance a unique name, you can use lists and count.index:
2. for_eachis used to iterate over a map or a set and create resources dynamically based on the iteration.
Example:
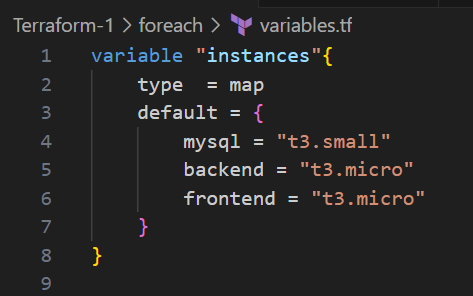
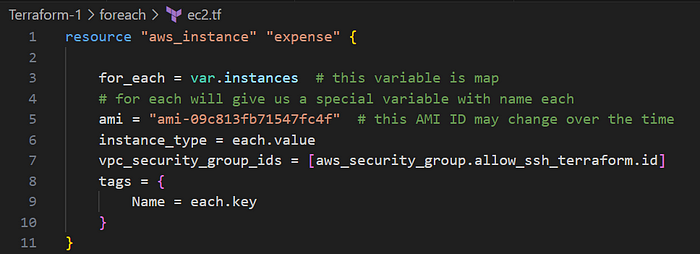
Explanation:
- The
for_eachloop iterates over theinstanceslist and create an AWS EC2 instance for each name in the list. each.keyis used to dynamically assign the instance name in each iteration.
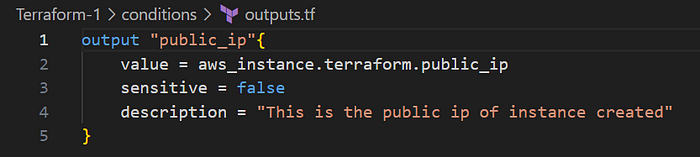
Terraform Outputs
Use the outputs.tf file to extract and display information after Terraform applies the changes.
For example:
Terraform functions:
- Terraform has no custom functions; we have to use only inbuilt functions.
- You can find the sample creation of functions in this link: https://developer.hashicorp.com/terraform/language/functions
> max(5, 12, 9)
12
Terraform Data Source
- Data sources allow Terraform to use information defined outside of Terraform, defined by another separate Terraform configuration, or modified by functions.
- A data source is accessed via a special kind of resource known as a data resource, declared using a
datablock:
Example:
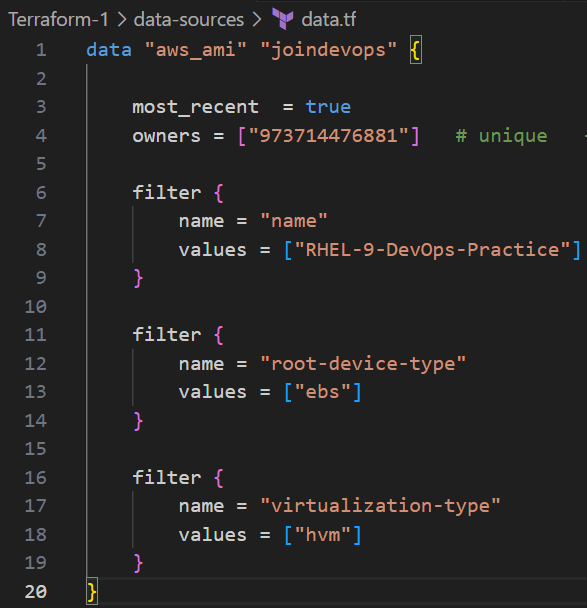
Explanation:
- In this example, the
data "aws_ami"block fetches the latest AMI (Amazon Machine Image) owned by the user that matches the nameRHEL-9-DevOps-Practice. - This data is then used to launch an EC2 instance with the fetched AMI in the resource block.
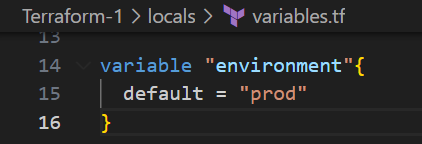
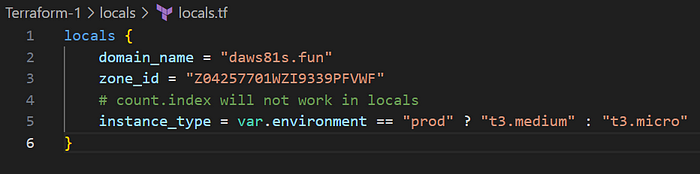
Terraform Locals
- Locals are used to assign names to expressions to avoid repeating them multiple times. These are useful for organizing complex configurations.
- A set of related local values can be declared together in a single
localsblock:
Example:
Create avariables.tf file and add the variables in it
Take locals.tf file and add the content given below
- Use the local variable in the EC2 instance

Explanation:
- The
localsblock definesinstance_typeandenvironment. These can be reused throughout the configuration instead of hardcoding the values multiple times. - It simplifies configuration maintenance and readability.
Terraform Remote State
- The remote state allows Terraform to store the state file remotely (e.g., in AWS S3, Azure Blob Storage, etc.) and share it among multiple team members or workspaces. This also enables you to reference resources from one Terraform configuration in another.
Example:
To add a remote-state configuration using an S3 bucket and DynamoDB for state locking in a provider.tf file
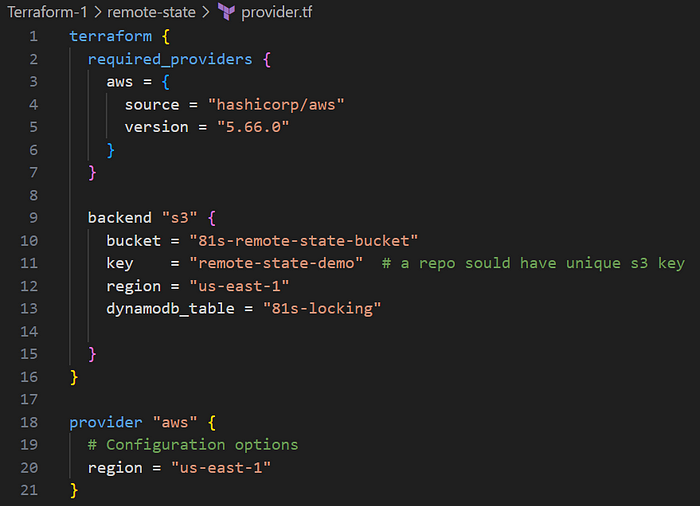
Explanation:
- remote state storage using AWS S3. Remote state allows multiple team members or environments to share state data, avoiding conflicts.
bucketThe name of the S3 bucket where Terraform will store the state file.keyThe unique path or key inside the S3 bucket to store the state file (e.g.,remote-state-demo). Each project or environment should have a unique key to prevent conflicts.regionSpecifies the AWS region where the S3 bucket is located (us-east-1).dynamodb_tableThe name of the DynamoDB table (81s-locking) used for state locking.
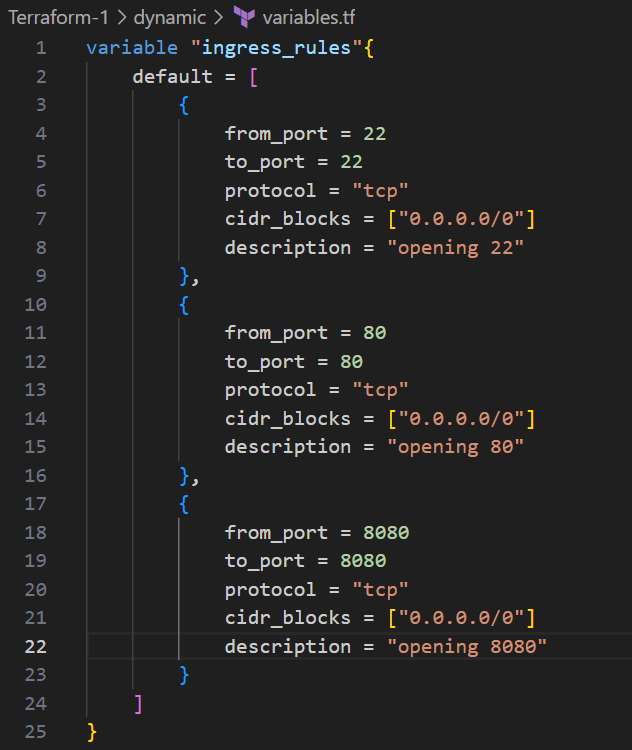
Terraform Dynamic Blocks
A dynamic block is used to generate nested blocks within a resource, where the number of blocks or their contents depends on variables or other expressions.
Example:
In variables.tf add the ingress rules required port numbers
- create
sg.tffile and add the below content
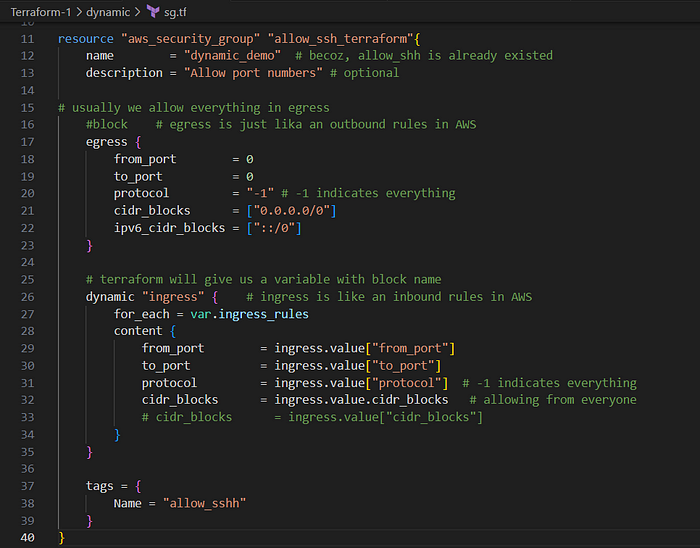
Explanation:
- The
dynamic "ingress"block iterates overingress_rulesand creates a set of ingress rules based on the input list. - This helps to avoid manually writing multiple
ingressblocks, especially if the number of rules can vary.
Terraform Provisioners
- Provisioners in Terraform are used to execute scripts or commands on a local or remote machine as part of resource creation or destruction.
- These are often used for configuration management or finalizing infrastructure setup.
- Both local-exec and remote-exec provisioners in Terraform are used to execute commands, but they differ in where the commands are executed.
1. local-exec Provisioner
- The
local-execprovisioner in Terraform executes a command locally on the machine where Terraform is being run. This means it doesn’t interact directly with remote resources.
Example:
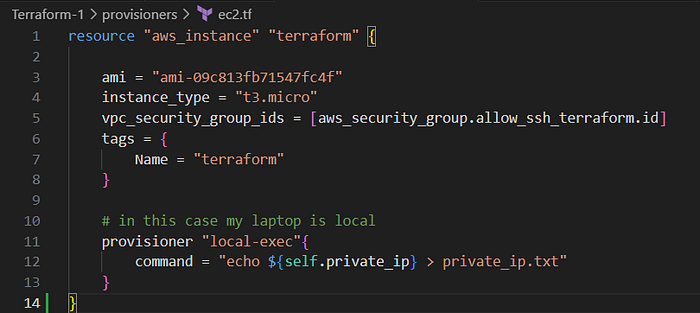
Explanation:
- The command
"echo ${self.private_ip} > private_ip.txt”is executed on the local machine (where Terraform is running) after the AWS instance is created. - Here, the output would be displayed on your local machine, and no remote connection is required to the AWS instance.
2. remote-exec Provisioner
- Executes a command on the remote resource (e.g., virtual machine, EC2 instance) after it is created. This is typically done using SSH for Linux/Unix machines.
Example:
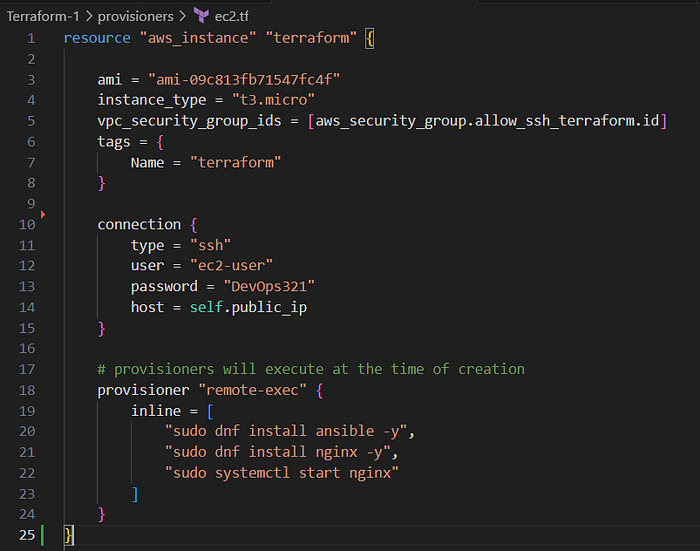
Explanation:
- In this example, Terraform connects to the AWS instance using SSH.
- After the instance is created, the following commands are executed remotely on the instance:
- The commands are run inside the EC2 instance after it has been provisioned.
Conclusion
Terraform simplifies infrastructure automation across various cloud platforms by using infrastructure as code. Its features, such as state management, support for variables, loops, and conditions, and a wide range of provider integrations, make it an essential tool in modern DevOps practices.
“Start where you are. Use what you have. Do what you can.” — Arthur Ashe
Keep learning!!!✨